How to take a good start
Once registered and your account validated, you can create your website.
To do so, you can follow your website creating steps to make things easier!
Let's go!
Go on your website back-office (the place where you can manage your website) passing the mouse on your website name, at the top of the page, and click on .
On the left, in the “Administer my website” part: go in the category .
We use the design by default. Here, we can click on the option Edit the design in order to change the design or the name of the design for example. There is also other options like:
-Editing the design variables : Here, we can modify the design overall settings, like the positioning of pages’ components, contents or backgrounds, colors etc.
-Editing the design options : In this option, we can choose to insert, or no, complete areas from the website, like the menu, the high part, etc.
-Deleting the design : Thanks to this option, you can simply delete the design and its settings.
2) Create a page
Now, we can create a page on Yoctown. Go on My pages. Here are 4 pre-created pages to know:
-
: It is the main page of our website, where your visitors will first end up.
-Page not found : This is the error page appearing when the page the visitors look for does not or no longer exist.
-Blog : This is the main page of your website blog.
-Contact : The contact page, as its name implies, allows contacting or finding you or information about you, etc.
So, let’s modify the homepage by clicking on Edit the page. We will include several pieces of information.
First of all, the H1 title, the main title of your page (the headline). Then, information related to the breadcrumb of your website; it is the tree view appearing at the top of pages when you are on the website, with the place you are.
Then, there is the Title Head option, allowing you to modify your page title. This title appears in your visitors browser’s tab and in the search result titles of search engines.
Then, the meta description of your page, that is to say the brief description of contents or services on your page, will appear on search engines, below the Title Head.
Then, there is the very complete text editor from which you can fill your pages with texts, images, galleries, forms etc.
Once your pages are filled, there is an option allowing you to insert module containers that is to say areas on the left and/or on the right of pages (generally designed for the insertion of menus or informative text). You fill module containers with menus, links etc. We will see it later.
Then, you can choose to put, or no, a password to access to the page or on comments for this page.
So, here is our first page. We are going to create a new one, in the same way than this one. So, we click on Add a page. We have more options, like the internal title – title that only you can see – so that you can identify your future pages. There is another available option, above the content: the URL option. Thanks to the URL, you can find and identify its attached page..
Be careful: even if this new page exists and is available for consultation on your website, the last page you created does not appear in your website menu yet. It is normal, we will see later how to make it appear on the menu.
3) Manage your Yoctown website’s menus
We created the page, now we want to insert it in a menu in order to easily access to the page. In order to insert it in a menu, go on the category My menus and click on the option Organize the menu in the menu you want to modify or in which you want to add a page.
Once you are on the menu’s organization page, select the page you want to insert in the menu thanks to the scrolling list. Select it and click on Add to the menu.
In this menu, you can modify the text that is to say the link text that will appear in the menu. Repeat the same handling according to the number of pages to insert in the menu.
Now we can create menus for our website, so that visitors can easily browse on the website and between the pages. Go in the category My menus and edit the pre-developed menu clicking on Edit the menu. Here we can change the name of the menu, so that we can easily get back to it thereafter.
Then we can organize the menu (clicking on the corresponding icon) and add the pages to insert in the menu. You can also slide menus in order to organize them in several sub-menus, in case there are several categories of pages, sub-pages etc.
So here is our first menu on Yoctown. We can create menus and place them in the website’s footer or module containers (on the side), you are free to create the website you want!
Be careful: The menus you recently created do not appear on your website yet. To make them appear, you have to link the areas you want to the menu. We will see how to do it later.
4) Create a module container
Module containers (or sidebars) will include menus and contents and will be placed on the side of your choice on your pages. They can be on the right, on the left or on both sides of the website pages.
If you want to create or modify them, go in the category My module containers and add or modify an existing module container.
You can even insert both and several things in a same container.
Be careful, the containers you created do not appear on your website. You will have to assign them to your pages if you want to make them appear. In this way, go in the category My pages, and select the page you want to assign the module container(s) to. In the editing, you will have to fill a part called module containers.
5) Yoctown website options
Now, we can change the various options of the website, like logos, footer settings, etc.
So we go in the category My options and click on Edit the options. There is a complete set of settings:
-Main menu : There you have to define what will be the main menu of your website, that is to say the largest menu on your website.
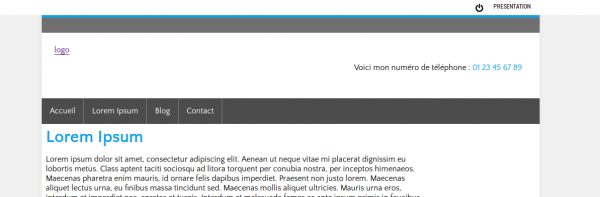
-The header logo : The header logo is the main logo on your website. Generally on websites, it is on the left top. For example, it can be the logo of your company.
-Your website favicon : Your website favicon is the icon on the browser’s tab next to your pages’ title head.

Here is the favicon and the page title head.
-ID Google Analytics : In the Google Analytics field, you have to give your Google Analytics ID – a tool checking the traffic on your website in detail. Once you gave this ID, connect to your Google Analytics management interface from https://www.google.com/analytics/ and look the traffic you may have on your Yoctown website.
-Domain name : The domain name is simply the name of your website on the internet. We can find it in your browser’s URL bar, at the top of the window.
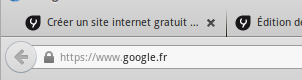
Here my domain name is google.fr.
-Copyright :The copyright is simply your website’s copyright and it is at the bottom of the website. We can detect it thanks to its corresponding symbol «©».
 Here is an example of copyright
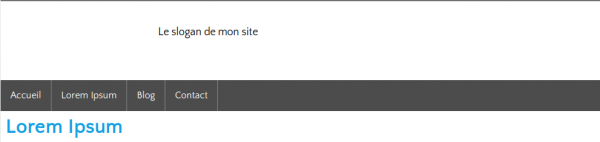
-Slogan : Your website slogan appears at the top of your website, on the right side of the logo. As its name implies, it is the slogan of your website.
-Display your phone number : This option allows displaying a phone number at the top right of your website. The related options:
-The text before the number : It is the text written before the phone number on your web page.
-Clickable phone number : Choose to make the phone number clickable or not, it allows your website users to click on the number and open another call app or program.
-Phone number : Here you have to give the phone number that will appear at the top right of your Yoctown website.
-Display networks : Allow to choose displaying or no the links to social networks at the top right of your website.
-Number of posts to display : You have to choose the maximum number for displaying your posts on your blog homepage.
-Your blog module containers : Define where to place module containers (left or right or right and left) on your blog and select them thereafter.
-Type of footer : You have to choose what your footer will look like.
Then, you can choose the content of your footer columns. You can choose your contents. If you want to adjust them, you have to choose content from your module containers. If you want to create one, go on the option My module containers and create content for your footer columns
-Text before the breadcrumb : Choose the text coming before the breadcrumb. The breadcrumb is the indicator at the top of the page indicating on which page you are in the pages chronology. It looks like this: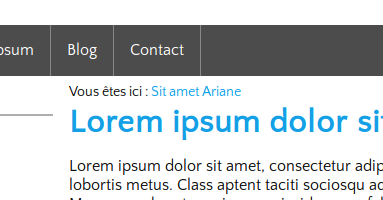
(By default: You are here)
-Breadcrumb delimiter : Choose the typeface(s) delimiting the breadcrumb pages in the name of the page where your visitor will be while displaying the breadcrumb.
-Website name : Indicate the name of your website.
6) Manage your image content on Yoctown
Yoctown offers you many possibilities to manage your image content. You can create categories and store your images on the server, create galleries that you can insert in your pages, reference your images for SEO, etc.
Go in the category Multimedia files in order to publish your images.
If you want to import your files on your Yoctown interface, you can slide them in the required area or click on this area and insert the files you want to import.
You can also Create a category to classify your pictures and your images. Choose the name of a category and continue.
If you want to add an image within this category, you have to click on the button Edit the media. Here you will be able to insert the name of the media, its description used for the image referencing on Google, as well as its category – in which you want to classify the image.
In order to insert an image on your pages, go in the option My pages and select the page to modify, in which you want to insert the image. Go down to the text edit and choose the option Insert an image from my library. A window will appear and you will have the choice to: import an image from your multimedia files library or import them from your files on your computer/phone. Once the image is selected, insert it and place it where you want.
You can also create Image galleries or Albums. To do so, go on My albums and click on Add an album. Once it is done, you have to indicate a title for your album, an alias – it allows easily identifying it in the source code (it does not directly concern you) - as well as a description of this album.
Then, click on Add photos to the album. You only have to click on the pictures you want to add within this album and it works, the images are added. You can also classify the photos in the album clicking on Classify the album photos, once inside you can slide them thanks to your mouse.
If you want to insert your albums on your pages, go on My pages and click on Edit the page. Click in the text, where you want to insert it, and click on the button Insert the gallery.
A line of code appears, it means that your gallery is inserted.